2-3. 라우트 코드스플리팅 하기
준비하기
우선, 우리가 이전 섹션에서 작업한 SplitMe 관련 코드는 날려주세요. 연습삼아 한번 해본것이기 때문에 더 이상 해당 코드들은 필요가 없어졌습니다.
그리고, 다음과 같이, asyncComponent 함수를 lib 디렉토리에 저장하세요.
src/lib/asyncComponent.js
import React from 'react';

export default function asyncComponent(getComponent) {
  return class AsyncComponent extends React.Component {
    static Component = null;
    state = { Component: AsyncComponent.Component };

    constructor(props) {
      super(props);
      if (AsynComponent.Component) return;
      getComponent().then(({default: Component}) => {
        AsyncComponent.Component = Component;
        // 여기가 constructor 이긴 하지만 이 함수는 비동기적으로 작동하기에
        // 실질적으로는 컴포넌트가 마운트 되고 나서 실행되기 때문에 this.state.Component = ... 가 아닌
        // this.setState(...) 로 진행합니다.
        this.setState({ Component });
      });
    }

    render() {
      const { Component } = this.state
      if (Component) {
        return <Component {...this.props} />
      }
      return null
    }
  }
}
코드스플리팅을 위한 라우트 인덱스 만들기
섹션 1에서 우리가 프로덕션에서만 코드스플리팅을 지원 할 것이라고 했던 것, 기억나시나요? 개발서버에서는 코드스플리팅을 적용하지 않고, 프로덕션에서만 적용을 하기 위하여, 우리는 코드스플리팅을 위한 라우트 인덱스를 따로 만들것입니다.
우선, index.async.js 라는 파일을 pages 디렉토리에 만들고, 다음과 같이 코드를 입력하세요.
import asyncComponent from 'lib/asyncComponent';

export const Home = asyncComponent(() => import('./Home'));
export const About = asyncComponent(() => import('./About'));
export const Post = asyncComponent(() => import('./Post'));
export const Posts = asyncComponent(() => import('./Posts'));
asyncComponent 함수를 통하여 코드를 비동기적으로 불러오는 컴포넌트를 생성해서 내보내주었습니다.
이제, App 컴포넌트에서 pages 를 pages/index.async.js 로 치환하세요.
그 다음엔, 브라우저에서 Network 를 열고 페이지를 이동해보세요.
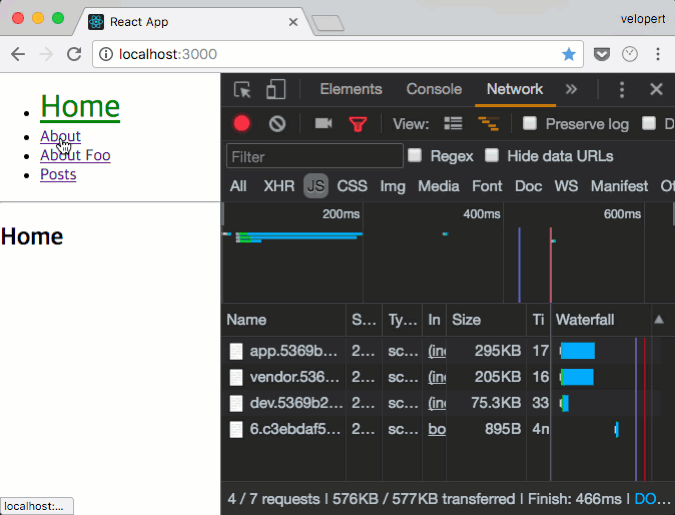
잘 되지요? 잘 되는것을 확인하셨으면, 다시 pages 로 원상복구 하세요. 왜냐구요? index.async.js 를 불러오는건 프로덕션에서만 불러오도록 설정을 할것이기 때문입니다.
웹팩 설정하기
자, 이제 프로덕션을 위한 웹팩설정을 해주겠습니다.
webpack.config.prod.js 파일의 entry 부분을 다음과 같이 수정하세요:
config/webpack.config.prod.js - entry
  entry: {
    vendor: [
      require.resolve('./polyfills'),
      'react',
      'react-dom',
      'react-router-dom'
    ],
    app: paths.appIndexJs
  },
output 의 경우엔, 이미 설정이 되어있기 때문에 건들일 필요가 없습니다. 그 다음엔, 프로덕션에서만 라우트를 코드스플리팅 하는 설정을 할 건데요, 원리는 간단합니다. 프로덕션 웹팩 설정에서는, 만약에 'pages' 를 불러올때 이를 자동으로 'pages/index.async.js' 로 치환하도록 하면 됩니다.
이 작업은 webpack 의 NormalModuleReplacementPlugin 이 해줍니다.
config/webpack.config.prod.js - plugin
설정의 plugins: 부분에 NormalModuleReplacementPlugin 을 넣으세요.
  plugins: [
    new webpack.NormalModuleReplacementPlugin(
        /^pages$/,
        'pages/index.async.js'
    ),
    // CommonsChunkPlugin 도 적용하세요.
    new webpack.optimize.CommonsChunkPlugin({
      name: 'vendor',
    }),
vendor 가 제대로 처리되기 위하여, CommonsChunkPlugin 을 적용하는것도 잊지 마세요~
자, 이제 여러분은 코드 스플리팅을 하는 방법을 익혔습니다. 이번 2장에서 배운 코드 스플리팅을 통하여 앞으로 리액트 어플리케이션을 만들 때 유저를 위하여 더욱 최적화 된 환경을 준비해줄 수 있겠지요?
여기까지 잘 따라오셨다면, 한번 yarn build 명령어를 통해 빌드를 하고 build 디렉토리를 확인해보세요.
λ yarn build
yarn build v0.27.5
$ node scripts/build.js
Creating an optimized production build...
Compiled successfully.

File sizes after gzip:

  48.76 KB  build/static/js/vendor.9dd08982.js
  1.75 KB   build/static/js/app.3833db68.js
  1.49 KB   build/static/js/0.bbf354d0.chunk.js
  373 B     build/static/js/1.d7706577.chunk.js
  247 B     build/static/js/2.cde08b11.chunk.js
  230 B     build/static/js/3.49981e98.chunk.js
  107 B     build/static/css/app.65027555.css

The project was built assuming it is hosted at the server root.
You can control this with the homepage field in your package.json.
For example, add this to build it for GitHub Pages:

  "homepage" : "http://myname.github.io/myapp",

The build folder is ready to be deployed.
You may serve it with a static server:

  yarn global add serve
  serve -s build

Find out more about deployment here:

  http://bit.ly/2vY88Kr

Done in 7.83s.
자바스크립트 파일들이 여러개로 잘 나뉘어져있나요?